Lord Gareth
-
Posts
24 -
Joined
-
Last visited
Content Type
Profiles
Forums
Blogs
Gallery
Downloads
Events
Everything posted by Lord Gareth
-

mod UI and AI Customizations Mod V1.9.2
Lord Gareth replied to pandakraut's topic in General Discussions
Yes, I download GOG package and: 1. replaced „Assembly-CSharp.dll” in /Contents/Resources/Data/Managed 2. replaced „resources.assets” in /Contents/Resources/Data/ 3. copied "mod" folder to /Contents/Resources/Data/ -
mod UI and AI Customizations Mod V1.9.2
Lord Gareth replied to pandakraut's topic in General Discussions
Doesn't work with GOG on Mac version After copying files, if I start game it will hang on opening screen. -
This is a great illustration of my aggresion problem... At Fredericksburg I had 32,000 soldiers versus 105000 union army. I won, Union lost 65000 soldiers, but... i lost 15000.
-
Politics -> Medicine -> Economy / Training / Logistics. After Fredericksburg I have: 10 / 4 / 10 / 4 / 6 / 3 / 0 But, from my perspective, the key element for CSA Legendary mode is to keep a balance between kills and loses, especially in Great battles. You must destroy most of the Union's troops in every battle if you want to maintain the size and quality of enemy army at an acceptable level but... above a certain level of own loses, a further attack becomes harmful even if You wipe out enemy troops. You will not be able to rebuild your army after battle. This is my main problem because I play aggressively by nature and have a problem to stop the attack at the right moment. Comparing with Lava battles, he almost always makes less damage for enemy but loses fewer own people. For exemple , at 2nd Bull Run Lava win with great style, he kill 43,360 and captured 1,482 unionists, destroyed 102 cannons and lost only 10,337 own soldiers. In my battle I killed and captured 49000 but lost almost 14500. This results that at key battle - Antientam, I had about 5000 people less in my army. Such a difference in this battle is a really big problem. I won, but the smaller army must be in constant motion to close the holes, which causes much higher losses. As a result, after this battle the problem grows. In the battle of Antientam with 39k army I was able to inflict a total of 54,000 losses to Union army, but I lost 25,000 soldiers. And again... this leads to the situation that at Fredericksburg my army has arrived with 32,000 soldiers versus 105000. Lava had 45000 at that moment. Conclusion, at Legendary Career Points are important, but it is even more important to ensure that losses do not exceed a certain level. Points will not be able to fix it.
-
What a great battle. This is perfect "all-in"... The only thing that annoys me is the first phase. In a real war, for this behavior the commander would at least be removed from command. The farm can be defended, so there is no justification for abandoning it.
-
But this causes that this is more an arcade than a strategic game. For exemple, under Siloh, the whole tactic is to force the troops to run to the corner of the screen before the opponent appears. And then killing his troops without any realism. And yet, with the entire map, the enemy has fortifications and other troops a few hundred meters away. In my opinion, here is a lot of room for the developer. A larger map, all visible from the beginning and making the decision of the opponent real, if panic it escapes and does not rotating without any sense.
-
From what I saw at Col. Kelly, to win Antietam, you must inflict very heavy losses to your opponent in previous battles. I think that in such a big battle as 2nd Bull Run, such a thing is easier to achieve with a larger army than a smaller one In other words I think You must go "All in".
-
Great battles, but they show the most frustrating part of Ultimate General - unrealistic traps in edge and corners of the maps. I hate it and try not to use it because it destroys the reality of command and falsifies the final result in terms of losses. In my opinion, the maps should be much larger and enemy units should escape from the battlefield when they reach the edge. It's really annoying when I see a three-star opponent's brigade swirling in panic just because the map is over. Of course, this makes it difficult to fight at the legendary level. I got stuck on Antientam, 55,000 are not enough for 125,000 opponents
-
Honestly, after my extreme CSA campaign, commanding the Union's forces is obscenely easy. I just finished Gettysburg and won it properly in the first phase. I destroyed all the troops that my opponent had at the expense of a small total of losses. Then, from phase to phase, I knocked out the rest of the army. The last phase lasted a few seconds because the Confederacy had no unit. If it was not for the Battle of Chansellorsville, where through my aggressive style of playing it brought victory, but at the expense of 38,000 dead, it would be obscenely straight. I would have the entire third corps at my disposal instead of one division. My recipe for this battle was that in the initial phase I hit hard from the south, also going behind the western river and quickly destroying the enemy artillery. Along with the incoming reinforcements, I strengthened the attack in the center, also pulling the artillery with 24-pdr howitzers just behind my divisions. Then I rolled their entire front to north just for the time when their reinforcements came from that side. Then I pushed their western column from the hill and destroyed all their units on the plain between rivers and city. In the next phase, I rolled their troops from north to south. After I destroyed all his troops in the river valley, when their last reinforcements arrived in the north, his troops did not even try to attack. They sat in the woods until the end of the phase. The remaining phases were the slaughter of the survivors of the Confederate army. By the way, first time I took 7,500 prisoners.
-
[CSA] With one weak corps to (almost) Washington
Lord Gareth replied to Lord Gareth's topic in General Discussions
Can you extend the limit for attachments? Because I can not add more maps. -
[CSA] With one weak corps to (almost) Washington
Lord Gareth replied to Lord Gareth's topic in General Discussions
Later, I played this battle many times as a training and I managed to even win it. To do this I had to apply a trick related to gameplay and not real military tactics. Watching the timer I had to leave Marye's Heigts at the last minutes and throw troops across the river. After cutting off the map, it was necessary to reach the edge of the forest at Trafalgar Road as quickly as possible. The II Corps covered the rear at this time. Then the II Corps retreated fortifications and slowly goes to base fighting all the time. This slow down the northern wing of the enemy. The troops on the edge of the forest were shooting at the enemy in the open, and when he started to storm, I retreated deeper into the forest without a fight. This allowed to avoid excessive losses. Of course, in a real battle such abandonment of Marye's Heights would cause her to fall in a few minutes. -
[CSA] With one weak corps to (almost) Washington
Lord Gareth replied to Lord Gareth's topic in General Discussions
Fredericksburg Another big battle, but this time with an extremely small army. After viewing the initial map, I decided that there is no chance to stretch such small forces so I left Prospect Hill right away. In the center, I placed microscopic forces to support the wing of the main troops (I did not plan to defend Telegraph Road) and practically put all my strength on Marye's Height. An optimistic plan was that the winger attack from the north towards Telegraph Road would clear the city and push the opponent into the center. There, I wanted to take Telegraph Road back, hoping it would be enough to draw. After turning on the battle, I looked into the conditions. It looked better then expected. Draw was quite possible. If my plan was successful, this battle could be even won. Of course, due to the lack of "Reconnaissance" points, I did not know what to expect from my opponent. The introduction was optimistic. In the battle for bridges I knocked out most of the opponent's brigades, and even the winged attack of skirmischers destroyed both artillery batteries. At Prospect Hill, I could only move the timer forward because I did not have an army there. Marye's Height - just watching the battlefield made realism come back. My brigades were not enough to fill all fortifications. Because the center would have to be heavily defended, there would be more holes on the left than the army. I did not have units for reserves or offensive actions. But... I decided that the original plan, after modification, is still suitable. I ignored the hills on the left wing. I placed the four brigades on the left wing near fortifications and river. The brigades were supposed to go out over the river, step back, draw the portions enemy into the river and smash the fortifications storms with fire from the flank. I hoped that this tactic give a lot of losses to my opponent, and after weakening his wing I could hit him strong as predicted in initial plan. On the right side, I had one brigade hidden in the valley, which was supposed to attack the storm troops. The victory did not look real anymore, but the draw... Everything went better than I could have imagined. Big losses weakened the opponent's wing, the attack on this wing crowded him on the foreground of the fortification but during the slaughter something that I did not foresee happened. Gameplay cut off Marye's Height and left Telegraph Road and Prospect Hill map. All my valuable troops have disappeared and the weakly II Corps could only die with honor. I thought I would throw the computer out the window. The final result made me feel a bit better - a draw and a decent level of loss. The number of opponents was also quite shocking, so I finally accepted this result.

-
[CSA] With one weak corps to (almost) Washington
Lord Gareth replied to Lord Gareth's topic in General Discussions
In campaigns like mine, it's part of the strategy But ... in war games I always play to maximally simulate the dilemmas of real command. That's why I never did that I let out a battle while avoiding the fight. I only let go if the situation on the battlefield clearly showed that further fight is pointless. For the same reasons, I used the results of the first battles for my career even if the next two attempts resulted in a better result. Therefore, the draws or victories achieved in the second or third attempt I value less than those from the first battle. Simply, the first battle in which we do not know the opponent's strategy is more real. The exception to this rule are battles such as Fredericksburg where game mechanics ruin tactics. More on the subject in the description of the battle. -
[CSA] With one weak corps to (almost) Washington
Lord Gareth replied to Lord Gareth's topic in General Discussions
Winter 1862 Campaign (before Fredericksburg) After Antientam, the size of my army fell to the title level - one weak corps with about 15,000 soldiers. Corinth - I attacked from the east, from the north-west I watched only enemy brigades fleeing from the farm. Losses could be lower, but they were not. Prairie Grove - here I've kept my concentration, I attacked from the west and won the battle with low losses. As a result, for the battle of Fredericksburg, I've collected a really crazy amount of troops: But it is not everything. I collected only 49 reputation points, so I had to draw this battle because of -50 points penalty for Defeat...

-
[CSA] With one weak corps to (almost) Washington
Lord Gareth replied to Lord Gareth's topic in General Discussions
I use Preview app (part of macOS). -
[CSA] With one weak corps to (almost) Washington
Lord Gareth replied to Lord Gareth's topic in General Discussions
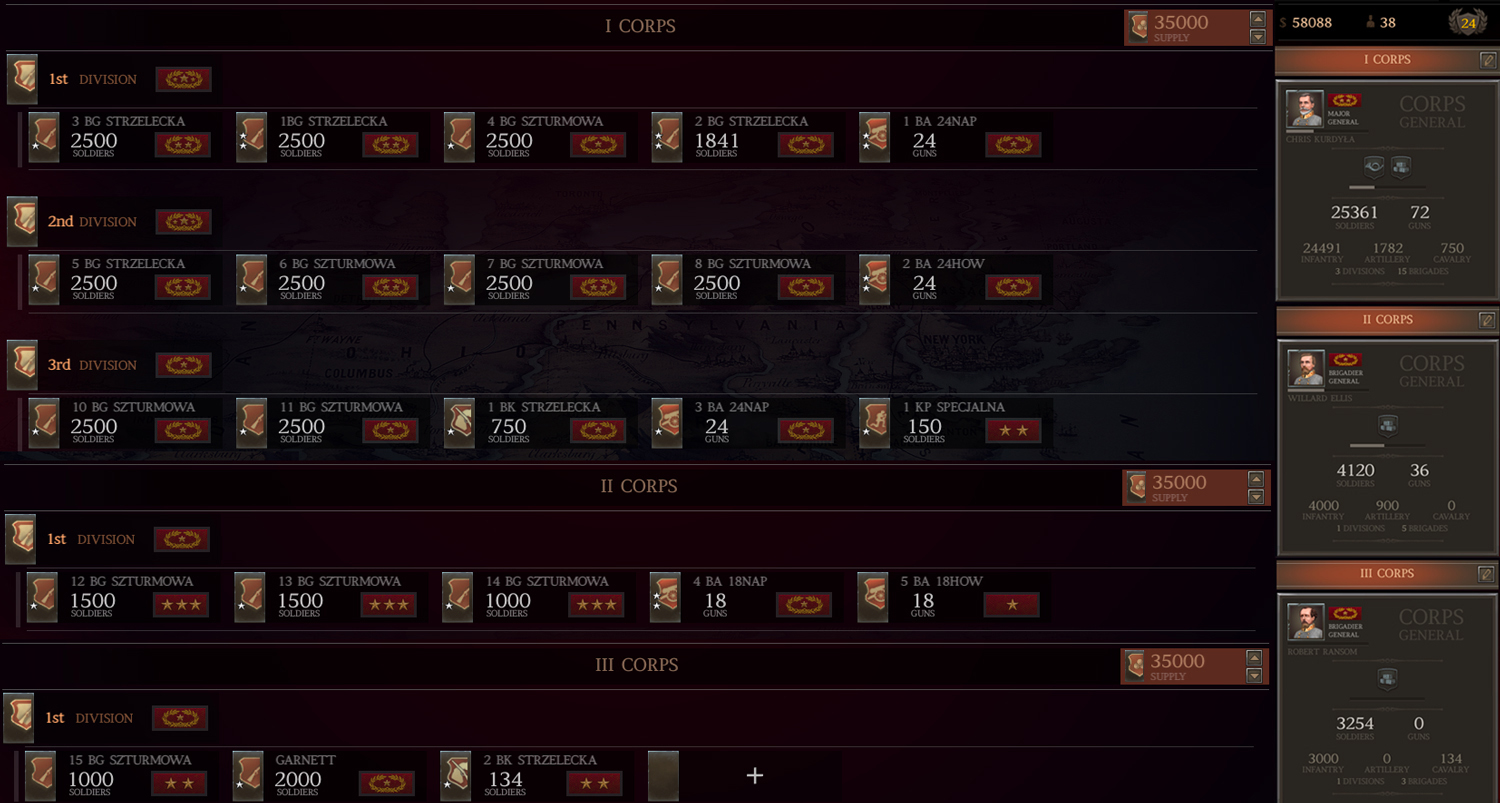
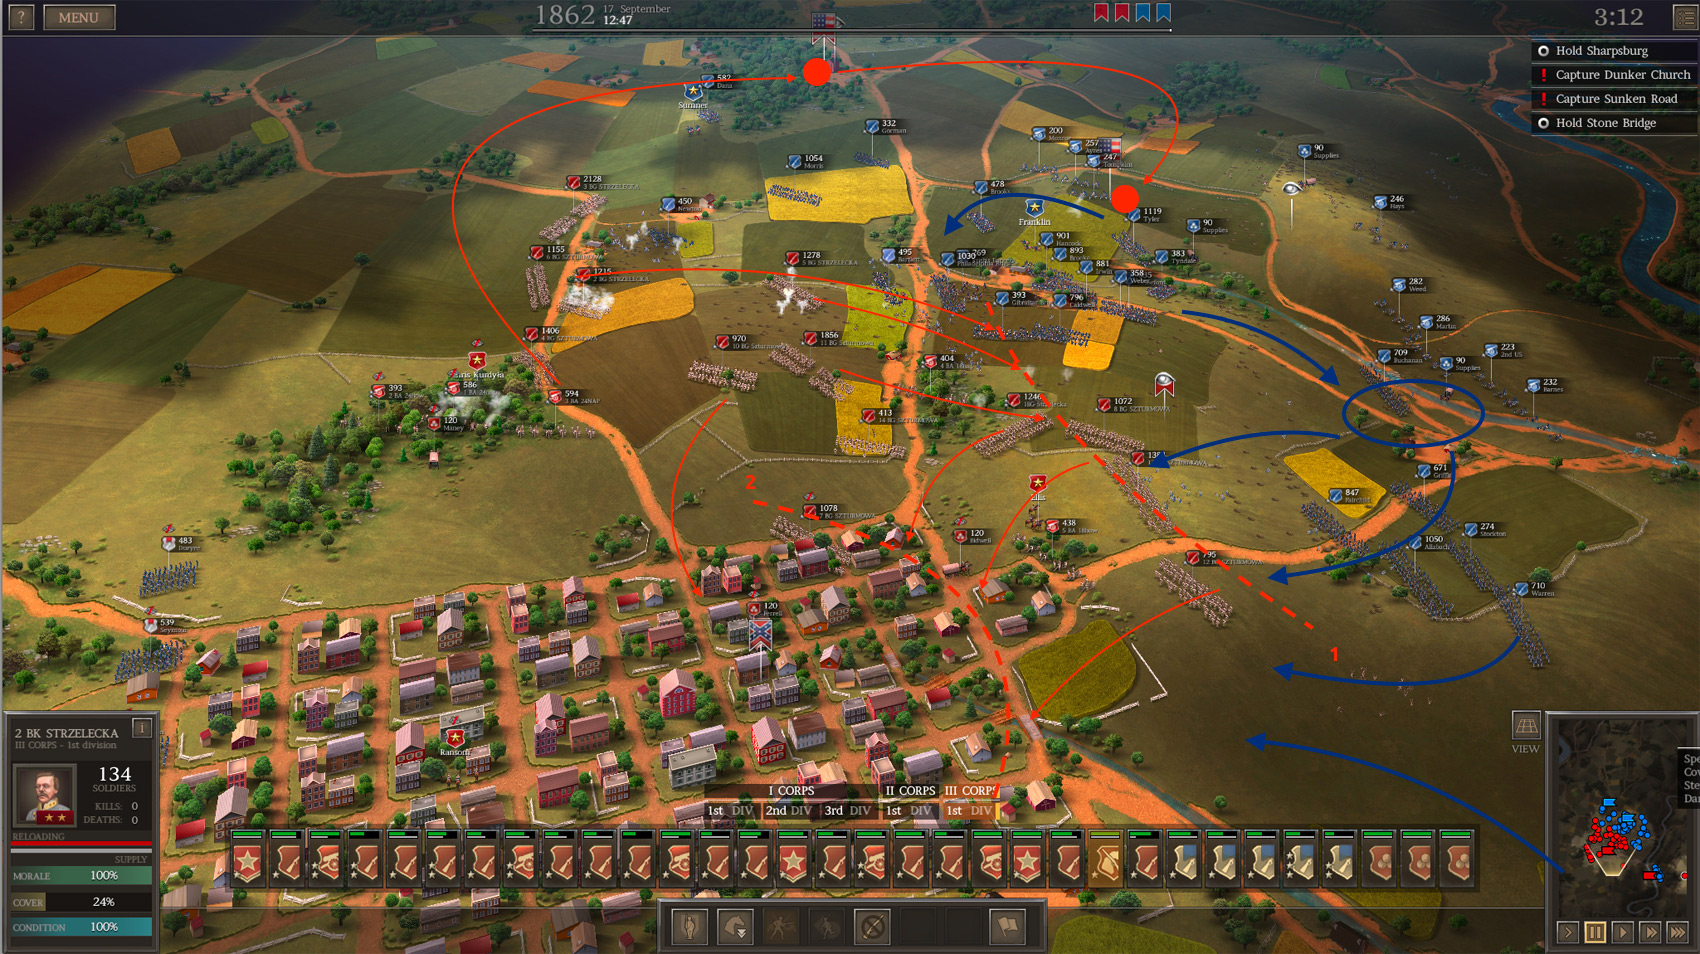
ANTIENTAM Before Antientam, I rebuilt the army to the level of 32,000 soldiers. I thought that the battle would be difficult, and the necessity of having 3 corps did not improve my feelings. I decided to create one strong Corps in the north and two very weak for the center and the south. In fact, there was one division in the center and Stone Bridge was defended by two weak brigades. From that moment, I introduced a name system for brigades to make it easier to manage them on the battlefield. Infantry brigades with rifles with a larger range were given the name "shooters", those with worse rifles were given the name "stormtroopers". As you can guess, if I want to charge, I tried to use stormtrooper brigades. In the first attempt I definitely lost. I wanted to use the fortifications in the center. I set up troops linearly. I survived the first phase, but when unionist reinforcements arrived they spread my defensive lines by attacking from the east and south-east. It was the turning point of my playing in this campaign. For the first time I so deeply analyzed the battlefield and developed a detailed defence plan before turning on the battle itself. The plan was as follows: Strong attack in the north, run until Union reinforcements arrive. Then shortening the defence lines in two stages. In this part, I predicted an intermediate line of defence. The plan was to make maximum use of the forest lines for the protection of my troops and open spaces for opposing losses. The retreat from intermediate line was foreseen after the first storms. It looked great. On paper. In reality, it looked much harder. While the first phase came out even better than I thought. My aggresive attack from the north brought such gains: The first and second phase of shortening the defence lines also went quite well. But after the end of the retreat, when I looked how stretched my brigades were, I realised that the plan was unreal. I probably could defend the Dunker Church, but I was too weak to maintain Sunken Road (open area) and I did not have anything to stop the Union on the way to the city. I defended my positions against the first storms and decided on a radical solution. I withdrew all the troops on the ridge around Sharpsburg. I concentrated the strongest brigades on the west side. When Union reached my line, I hit east and rolled his line all the way to the eastern border of the city. It opened way to Dunker Church and there were no more Union troops. At the same time, the Union's forces concentrated on the east and attacked the city where I had the weakest brigades. The situation was critical. I put everything on one card. I separated the skirmishers from the three brigades and sent them with one weak brigade to Dunker Church. The strongest brigade remained on the ridge and continued the attack to the east. I withdrew all other brigades to the city streets. Skirmishers secured Dunker Church. Then they went to Sunken Road and secured it to and destabilized the artillery there. The battle ended in victory. The camp after the battle looked tragic. Antientam cost me a lot of nerves, my army suffered huge losses but at the same time gave a lot of satisfaction and experience.


-
My favourite general

-
[CSA] With one weak corps to (almost) Washington
Lord Gareth replied to Lord Gareth's topic in General Discussions
Maryland Campaign (before Antientam) After the shocking losses under the 2nd Bull Run, the battle for the Weapon Factory came. I once again tried offensive tactics hoping for big profits in the form of captured weapons. Unfortunately, despite the name of battle, the gains were embarrassing and the losses were bigger than I expected. In the battle of Chantilly, I decided to play in a very disciplined way. I kept all the army in the forest, making sure that my opponent was in the open all the time. The effect was very good, low own losses, considerable losses of the opponent. That's how I got to Antientam, the first battle in which the previous mistakes hit me with full force. From that moment on, I started working on a tactic that would give me the chance to reach me with microscopic forces as far as possible.
-
[CSA] With one weak corps to (almost) Washington
Lord Gareth replied to Lord Gareth's topic in General Discussions
2nd Manassas Campaign Quite an interesting and full of mistakes campaign that initially distracts attention from problems with recruit and money. Cedar Mountain - played in my classic style, simulating the attack in the center and a strong attack from the northeast. Probably average losses. In total, the battle to be forgotten. Manassas Depot - a very chaotic battle in my performance due to the fact that entrusted troops did not match my style of play. A lot of small brigades that panicked earlier than expected would have caused a slaughter in the fight for the northern depot. 2nd Bull Run - probably My worst battle. Unfortunately, I won the first time, so the result went to my career. Enormous losses caused by the fact that I divided the army badly. I decided that since the defensive position is strengthened, I will set a weak corps there, and my well-developed I Corps will fall on the opponent from the side. A similar mistake as in the battle of Gaines Mill, although here I simply underestimated the scale of the Union attack. The farm went easy. Unfortunately, the first phase of defence of the main position was a torment. My corps consisted of 9 weakest brigades (7 infantry and 2 artillery). I've tried to keep on fortifications for too long. Because of that I lost a lot of people on them and then I retreated into the forest under heavy fire. The Corps was badly damaged, the brigades were easily panicked. The defence of the forest and VP point was chaotic and bloody. In this phase the II Corps lost over 40% of soldiers (about 5,000 people). In the next phase (second day), before the First Corps arrived (again*), almost nothing was left of it. But it maintained its position. *It is not very wise that the game, moving to the next day, drew back the corps to the starting position. However, I did not notice myself that between the days, it was possible to make changes in their compositions Painful mistake. The I Corps in the initial phase also suffered a lot of losses, because he had to reach out to help the weaker one. As a result, there was no time for subtle tactics but I hit the side of the Union's troops with the whole division. After the crisis was over, further part of the battle was already easy. This costly battle caused that the next campaign I started with 25,000 soldiers and "Politics" - 6 points, "Medicine" - 2 points. In this situation I went on the last straight before Antientam.
-
[CSA] With one weak corps to (almost) Washington
Lord Gareth replied to Lord Gareth's topic in General Discussions
Malvern Hill Another big battle in which you can see that the army is too small. 40 divisions to fill in the required two corps, I had 19. The battle was rather easy but bloody. I attack with the majority of forces along the eastern river and pushed my opponent into the river valley in the west. It opened the corridor to the western and eastern hills which I gained practically without a fight. It was expensive to push unionists into the valley because the fight took place in the open field. I repeated this battle three more times. The best result was 8k of own losses and 12k of casaulties for the opponent. The original result went to the career.
-
[CSA] With one weak corps to (almost) Washington
Lord Gareth replied to Lord Gareth's topic in General Discussions
The Peninsula campaign After testing the mechanics of the game at earlier stages, I started to work more seriously. At this stage, I accepted the principles that: - if I do not win/draw at the third time, I restart the campaign. - If I win the battle, I take my first successful result for my career. Even if in the replay I achieve a much better result. These rules have aggravated the problems with money and recruit. The first battles of this period were full of errors and, in effect, quite bloody. But ultimately something had to make such a big difference in the armies at a later stage of the campaign 1ST WINCHESTER The battle went smoothly, but because I wanted to destroy the Union's army completely, I did not finish the battle when it was possible. I fought to the end. The Union forces were completely broken, but the losses I suffered were far too high. Union:Str.: Infantry: 8648 • Cavalary: 852 • Guns: 44 (1062)Cas.: Infantry: 6364 • Cavalary: 484 • Guns: 32 (806) • Missing: 884CSA:Str.: Infantry: 9452 • Cavalary: 750 • Guns: 36 (900)Cas.: Infantry: 4344 • Cavalary: 284 • Guns: 9 (241) • Missing: 0 I improved it in the next battle I played: * * * PORT REPUBLIC The first battle in which I did perfect strong and deep impact with one of the wings. After reaching the goal, I did not attacked opponent on the other side of the river. I watched only to destroy his counterattacks. The result was quite pleasant - losses below 1000 killed. Union:Str.: Infantry: 9724 • Cavalary: 0 • Guns: 67 (1623)Cas.: Infantry: 2214 • Cavalary: 0 • Guns: 13 (321) • Missing: 4CSA:Str.: Infantry: 10548 • Cavalary: 536 • Guns: 64 (1600)Cas.: Infantry: 816 • Cavalary: 49 • Guns: 0 (28) • Missing: 0 * * * CROSS KEYS I lost the first try because of the experimental tactics. After sending the reconnaissance I saw that the opponent's brigades are walking in my direction in quite considerable distances. I was curious if I could cross the river and break up his brigades before they could concentrate. It was impossible, at least not with my experience at the time. The second attempt I played typically, the defensive in the middle, the fight on the wings and cavalry in the deep rear of the enemy. Victory, unfortunately for the price of considerable losses. The third attempt was quite decent, but the first victory went to the career according to the rules. Union:Str.: Infantry: 15072 • Cavalary: 0 • Guns: 51 (1254)Cas.: Infantry: 6615 • Cavalary: 0 • Guns: 14 (376) • Missing: 0CSA:Str.: Infantry: 13500 • Cavalary: 487 • Guns: 44 (1072)Cas.: Infantry: 5031 • Cavalary: 389 • Guns: 19 (466) • Missing: 0 And so I got to Gaines Mill, the first battle requiring two corps. * * * GAINESS MILLS Already an initial map suggested that something went wrong. Two corps, 50 brigades to insert. I had just about 15 brigades. I won the battle in the first attempt without special difficulties. The main problem was that the initial map did not indicate that the winger attack is very delayed. I planned that the weak II Corps will occupy the opponent from the front, and a powerful hit of the I Corps will destroy it. My Army at this battle: I CORPS (2 Divisions): 7x 2k Infantry Brigades, 3x Artillery B. (11, 16 and 24 guns) II CORPS (1 Division): 1x 2k Infantry Brigade, 3x 1k Infantry Brigades, 1x Artillery B. (10 guns) The delay caused that the weak II Corps had to repulse the attack on the ridge, so there was some unnecessary loss. After the arrival of the I Corps, everything ended very quickly. Union:Str.: Infantry: 15948 • Cavalary: 430 • Guns: 64 (1552)Cas.: Infantry: 4077 • Cavalary: 71 • Guns: 36 (875) • Missing: 0CSA:Str.: Infantry: 19000 • Cavalary: 0 • Guns: 61 (1525)Cas.: Infantry: 5239 • Cavalary: 0 • Guns: 2 (86) • Missing: 371 * * * But the number of brigades that you could put up provoked me to look at YouTube. To my surprise, players at this stage had 40k - 50k soldiers. My 19k looked quite funny but because the Union was adapted to my forces (they had about 16k soldiers), I thought that nothing terrible was happening. Anyway, from this moment I started to develop the "Politics" parameter. -
[CSA] With one weak corps to (almost) Washington
Lord Gareth replied to Lord Gareth's topic in General Discussions
I completely agree that the losses in these battles were too high. It resulted from the fact that most often I saved the first win. In the next stage, I recognized this as a rule about which I will write in detail in the next post. For some reason this ratio of 60 vs 17 k occurred -
[CSA] With one weak corps to (almost) Washington
Lord Gareth replied to Lord Gareth's topic in General Discussions
For the sake of order, I put together the results of the first phase of the campaign. These were the battles in which I learned the mechanics of the battlefield and the mistakes in the management of the characters' skills were not yet visible. I played these battles two to three times using them as a training ground to improve tactics and to check different ideas. The battle of Siloh was particularly helpful here. At that moment, I treated this campaign so temporarily that I did not pay attention to which score I chose to go further For example, under Siloh I had all other games with much smaller losses, but I had to save the first attempt, in which I lost a lot of army in the unnecessary storm on the forest (before the last line of defense of the Union) THE POTOMAC FORT - Victory Union: Strenght: Infantry: 5078 • Cavalary: 0 • Guns: 16 (380) Casualties: Infantry: 3605 • Cavalary: 0 • Guns: 9 (260) • Missing: 108 CSA: Str.: Infantry: 3266 • Cavalary : 221 • Guns: 10 (210) Cas.: Infantry: 2359 • Cavalary : 176 • Guns: 3 (77) • Missing: 0 * * * NEWPORT NEWS - Victory Union: Str.: Infantry: 8639 • Cavalary: 485 • Guns: 21 (495) Cas.: Infantry: 2565 • Cavalary: 291 • Guns: 2 (66) • Missing: 0 CSA: Str.: Infantry: 5496 • Cavalary : 471 • Guns: 14 (322) Cas.: Infantry: 2553 • Cavalary : 210 • Guns: 2 (72) • Missing: 0 * * * 1ST BULL RUN* - Victory Union: Str.: Infantry: 21873 • Cavalary: 510 • Guns: 40 (894) Cas.: Infantry: 16449 • Cavalary: 392 • Guns: 29 (680) • Missing: 0 CSA: Str.: Infantry: 22316 • Cavalary : 350 • Guns: 29 (725) Cas.: Infantry: 11619 • Cavalary : 196 • Guns: 14 (420) • Missing: 468 * * * AMBUSH CONVOY - Victory Union: Str.: Infantry: 11456 • Cavalary: 1275 • Guns: 21 (465) Cas.: Infantry: 1699 • Cavalary: 261 • Guns: 3 (41) • Missing: 294 CSA: Str.: Infantry: 6000 • Cavalary : 1102 • Guns: 12 (300) Cas.: Infantry: 1393 • Cavalary : 662 • Guns: 2 (60) • Missing: 0 * * * STAY ALERT - Victory Union: Str.: Infantry: 13319 • Cavalary: 1220 • Guns: 60 (1443) Cas.: Infantry: 3959 • Cavalary: 369 • Guns: 3 (80) • Missing: 0 CSA: Str.: Infantry: 10000 • Cavalary : 125 • Guns: 56 (1400) Cas.: Infantry: 3465 • Cavalary : 100 • Guns: 7 (200) • Missing: 0 * * * SHILOH* - Victory Union: Str.: Infantry: 40852 • Cavalary: 1175 • Guns: 137 Cas.: Infantry: 21367 • Cavalary: 788 • Guns: 82 (2046) • Missing: 121 CSA: Str.: Infantry: 34854 • Cavalary : 750 • Guns: (3238) Cas.: Infantry: 18576 • Cavalary : 582 • Guns: 43 (1142) • Missing: 0 -
Hello, my name is Chris and I just end my first and unintentionally crazy CSA campaign. A few years ago I bought UG:Gettysbourgh and found that is a great game with really realistic simulations of civil war fights. About month ago I found that there is a sequel so I bought it. Well, I started the game. Because I had a hard week, I decided to play a few battles just for fun. I was planning to start the campaign seriously after the weekend. I chose the level of Brigadier General and it began. In short, I did not care about career and economic part of game and focused just on battles. On Saturday at 4 am I finished the battle at Siloh, the next day I got to the Cross Keys. The game on the tactical level made so much joy that I still did not pay attention to the affairs of the economy aspects of the game. Before the battle of Gaines Mills, my Career Points looked like this: At this battle (Gaines Mills) I began to notice that not paying attention to other matters has consequences. I started watching (always after I ended my battle) on YouTube how other players played their battles. It caught my eye that I had much less people and money at my disposal. At the same time, I noticed that despite the smaller forces, the game looks after the proportions between the armies. So I decided that the shortcomings are to catch up. I did not restart my career, I decided to continue with my current one. It soon turned out that the shortages were impossible to catch up and proportion between the armies ended somewhere after the 2nd Bull Run. The sum of my initial mistakes caused an unusually difficult and exciting campaign. For example, in one of the main battles, the ratio of forces was: I will describe the entire campaign soon. I will show what tactics I have used while fighting with such small forces. And of course how far I got on my way to Washington